Using FastBid to Measure and Take-off Drawings
Step 1: Open a drawing in FastBid
Step 2: Check the drawing size
More information: Check the Drawing Size
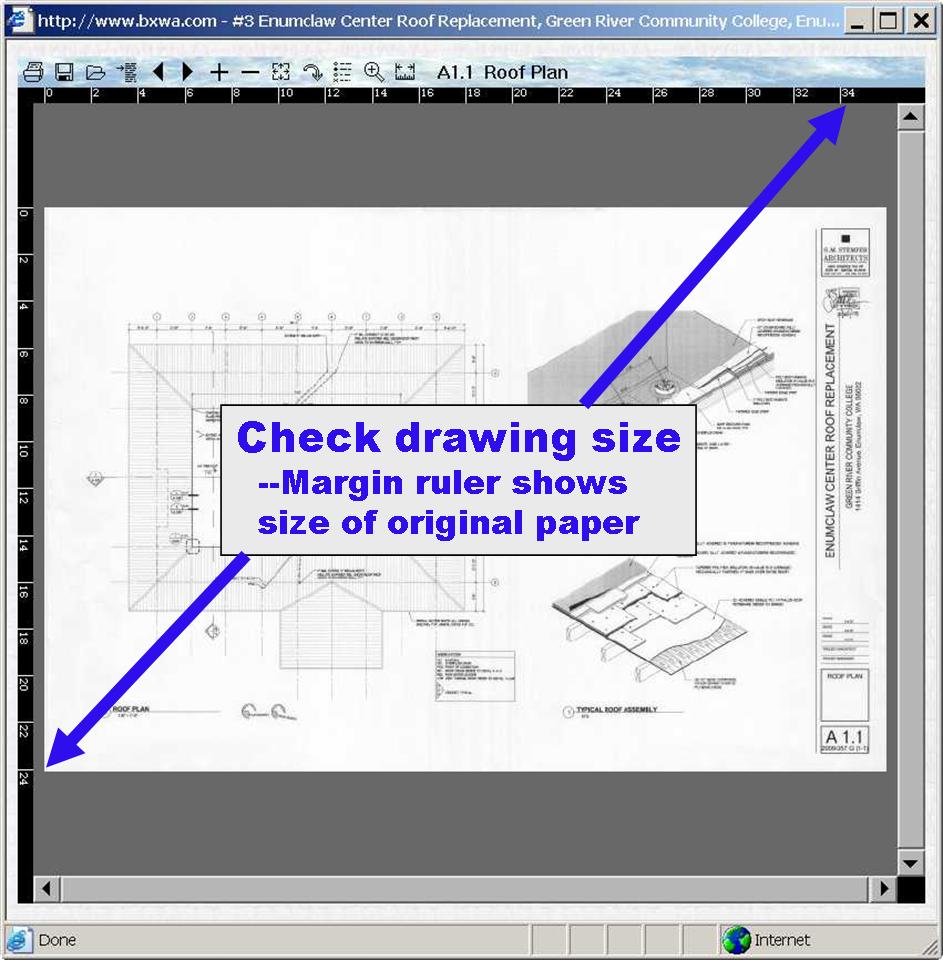
The Rulers at the top and the left of the drawing display show the size of the original paper drawing that was scanned or converted to the FastBid image.
Checking the size gives you a hint...did the scanned image originate from a full-sized or half-size set of paper drawings?
While BXWA encourages all Content Providers to provide full-sized drawings, some document Owners choose to provide half-size prints for posting. For this reason, you must always cross-check any measurements or take-offs with a known dimension in the image.
Step 3: Find the Drawing's scale (Zoom, Pan, or Magnify)
More information: Find the Drawing's Scale
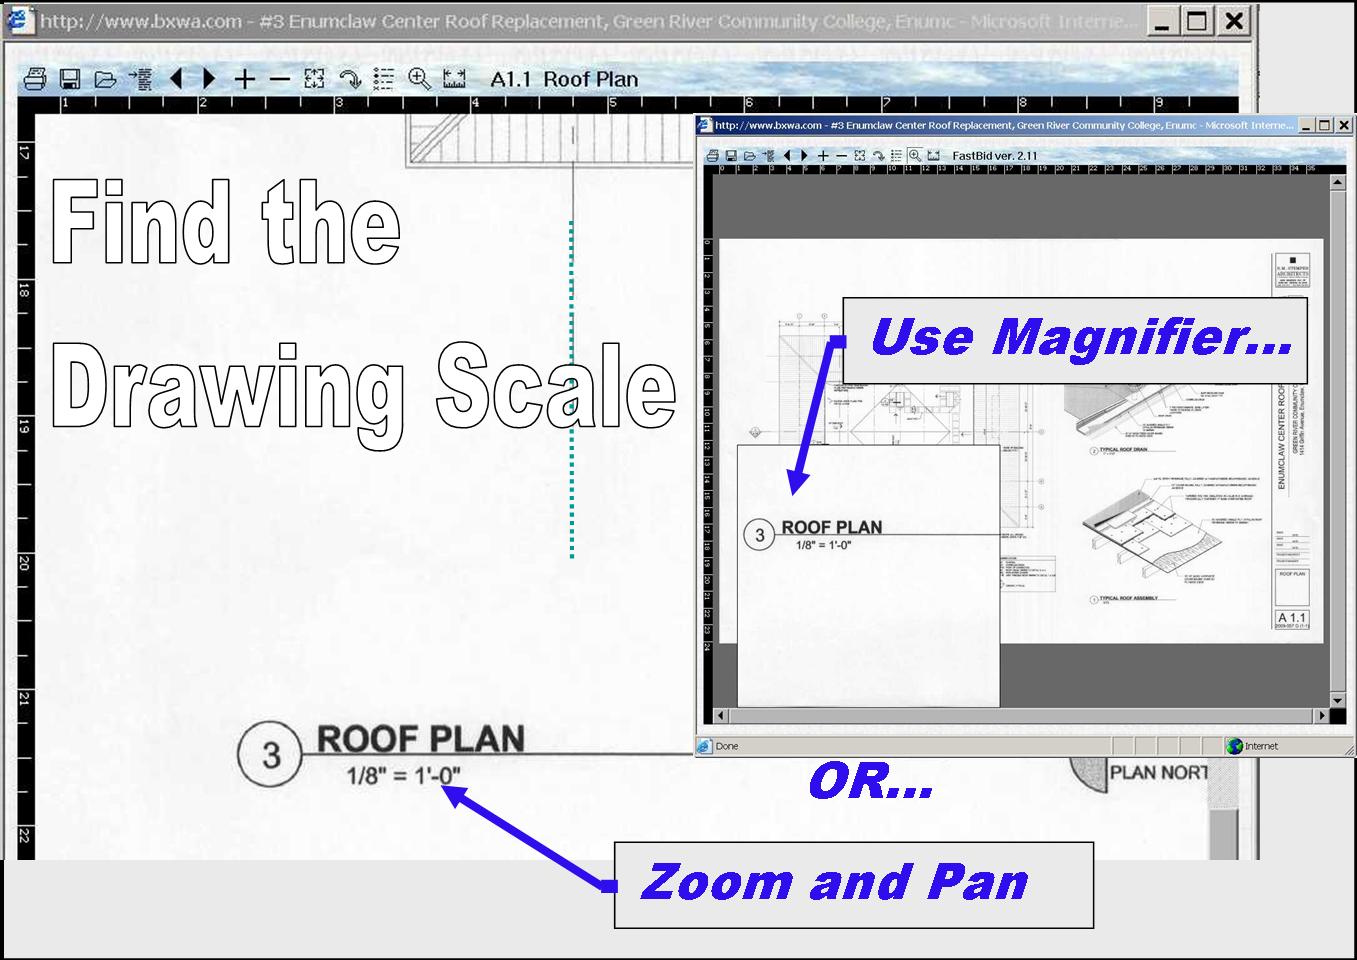
Before you can measure, you must tell the FastBid Reader the scale of the selected drawing. Typically, the scale will be located near the bottom of the drawing...or included in the Title block. Use the Zoom, Pan or Magnifier tools and methods to locate.
CAUTION: When measuring, always find a known dimension in the drawing and check a measurment against it.
While the scale may be clearly printed on the drawing, the actual drawing scale may be something significantly different. If there are no dimensions on the drawing, try to find an object such as a door that you can use as a reference.
A common scale error may occur when the original drawings were scanned from half-sized prints...failure to realize this will result in all of your linear measurements being one half of value they actually should be (area takeoffs are one quarter of actual). While Builders Exchange of Washington recommends that all Content Providers send full sized drawings for posting, ultimately, it is the Content Provider who has the final decision.
Another common scale error is setting the scale for the wrong drawing on a plan sheet. Frequently, there will be several drawings on one sheet...each with its own separate scale...be sure to use the scale associated with selected drawing.
If you cannot determine the scale of a drawing, you may need to contact the Designer or Owner of the posted Project.
Ultimately its your responsiblity to ensure the scale you use is correct.
Step 4: Open the "Measure take-off tool" (on Toolbar)
More information:
Opening the Measure Takeoff Tools
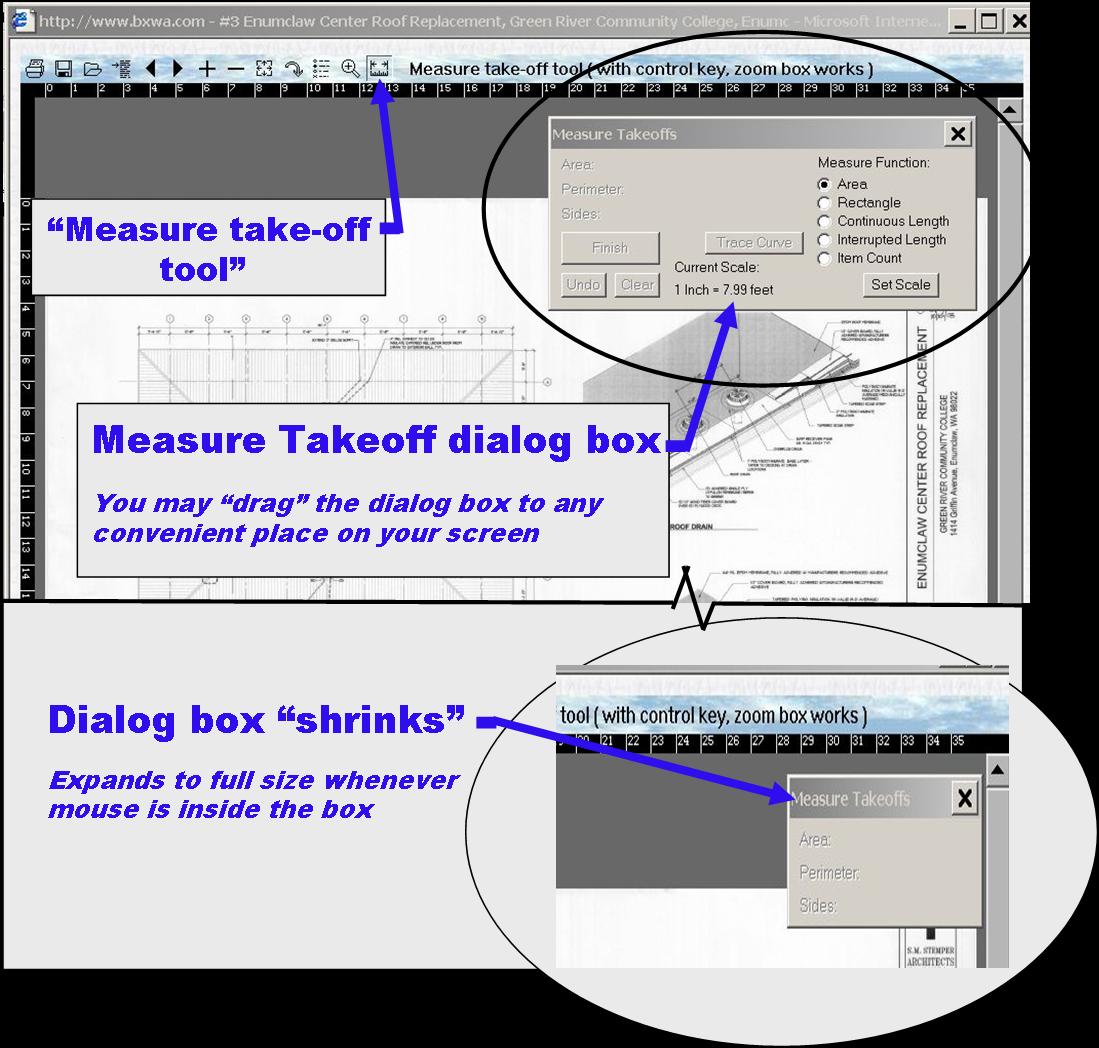
Open the "Measure Takeoff Tool" Dialog Box by clicking on the Toolbar (see image above).
You may drag the Dialog Box to any convenient location on you monitor. Notice that the Dialog Box automatically shrinks to a small size...then it returns to full size whenever your mouse hovers over it.
Step 5: "Set Scale" for Measuring
More information:
How to Set Scale for Measuring
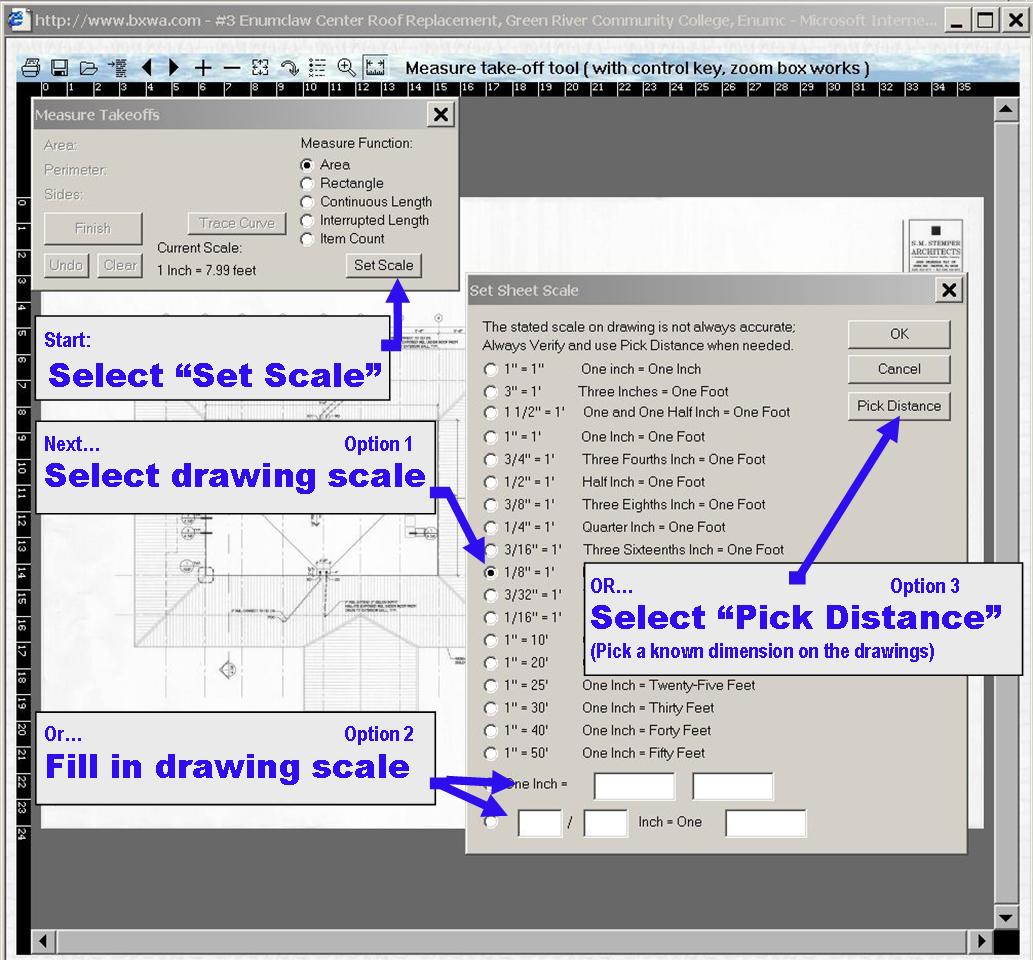
You must set the scale of your selected drawing before you can measure. To start, select "Set Scale" in the Dialog Box. This opens the "Set Sheet Scale" Dialog Box.
There are three methods for setting scale:
| Select Drawing Scale | Using the scale shown on the drawings, click on the appropriate "radio button". |
| Enter a Scale | At the bottom of the Dialog Box, there are two lines where you can directly enter an appropriate scale. Use these for drawings that have non-standard scales. |
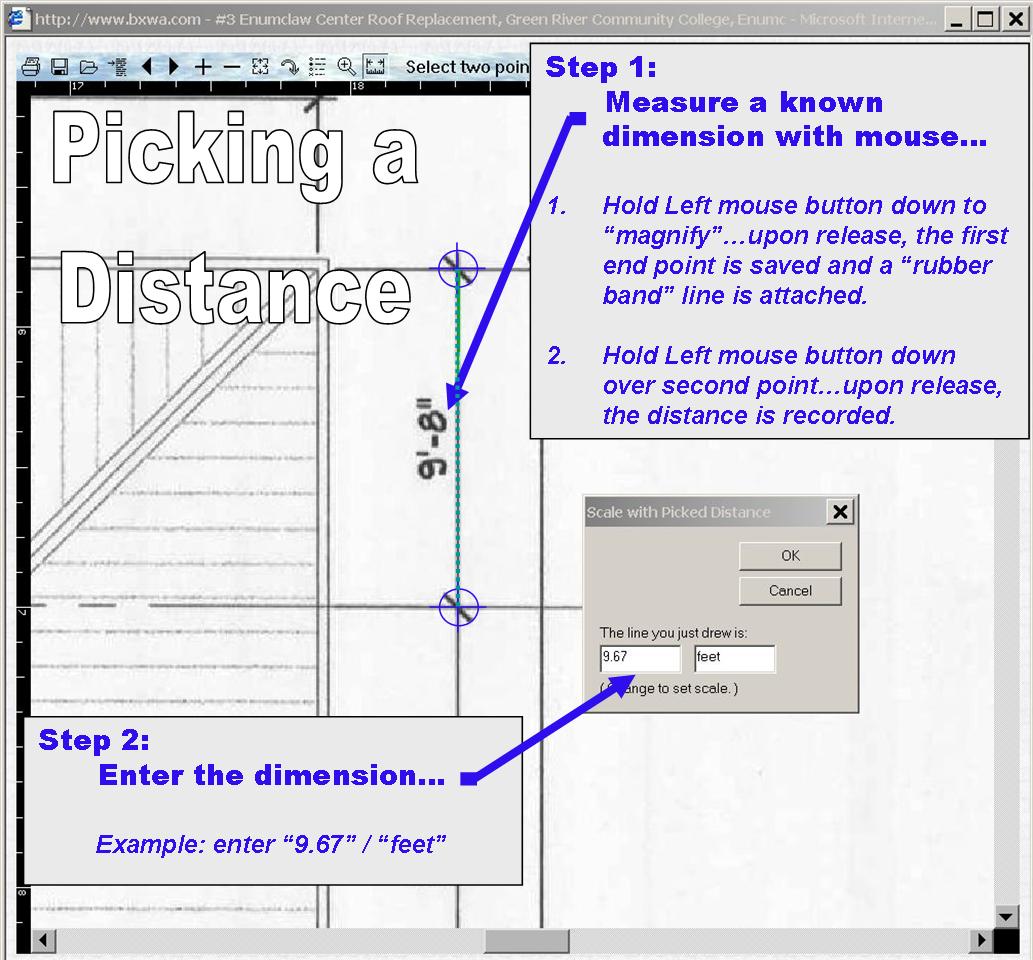
| Pick Distance | Use "Pick Distance" whenever you have known dimensions in a drawing that you can use as a reference. This is the most reliable method because it avoids problems associated with drawings that are not to scale or that have been posted at something other than the original Full Size. (See the image below) |
Step 6: Select "Measure Function" (area, line, count... )
More information: Selecting "Measure Function"

Select the type of measurement you wish to take-off:
| Area | Measures an area on the drawing of any size and shape. You start by selecting one
point, then work your way around the selected area, one point at a time. A rubber band
line is attached to the curser as you move. The selected area fills in to
show you what is being measured. The completed area is recorded in the Dialog Box
when you return to the start point or when you select "Finish" in the
Dialog Box.
You may take-off curved areas by using the "Trace Curve" Button. |
| Rectangle | Measures a rectangular area. You start with one corner of the rectanglular area and drag the box to the opposite corner. A rubber band box is attached to the curser as you move. When you release the mouse button, the area is recorded in the Dialog Box. |
| Continuous Length | Measures a connected sequence of lengths on the drawing. You start by selecting one
point, then work your way along the path, one point at a time. A rubber band line
is attached to the curser as you move. At the end of the sequence, you may double-click the
mouse button or select "Finish" in the Dialog Box to record the total length of the
line.
You may take-off a curved line by using the "Trace Curve" Button. |
| Interrupted Length | Measures a non-connectd sequence of lengths on the drawing. You must select the start and end point of each line. A rubber band line is attached to the curser as you move. The length of all lines and the number of segments (pieces) are totaled and recorded in the Dialog Box after each segment is completed. |
| Item Count | Counts items in the drawings. For each Left mouse click, an item is counted. A symbol is placed on the drawing for each count to show the items that have been selected. The count is totaled and recorded in the Dialog Box after each mouse click. |
Step 7: Use mouse to measure drawing (use "Ctrl" for Zoom)
More information:
How to Measure the Drawing
Whenever the "Measure Takeoff" Dialog Box is displayed, your mouse curser will display as a cross-hairs. A Left mouse click will initiate a measurement.
For each mouse click, a Magnifier window will appear at the point...hold the mouse button down while you precisely position the cross-hairs. When you release the mouse button, a rubber band line will be attached to the point...you may move to the next measuring point.
If you need to Zoom during a measurement, hold down the "Ctrl" key...this will suspend the measurement and allow your Left mouse button to perform its normal Zoom functions. When you release the "Ctrl" key, the measurement will resume. The Right mouse button's Pan and Zoom functions are not changed during measurement.
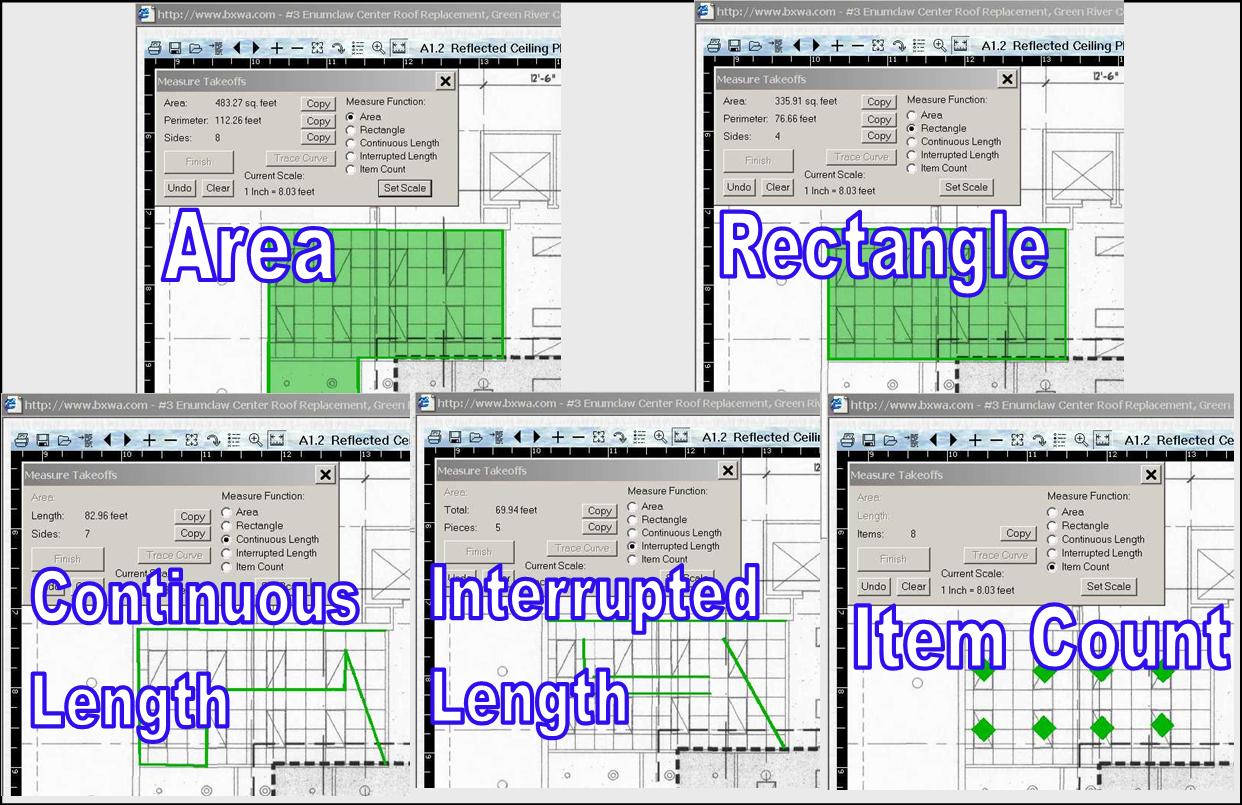
See the table and images below for details about each type of measurement.
| Area | Measures an area on the drawing of any size and shape. You start by selecting one
point, then work your way around the selected area, one point at a time. A rubber band
line is attached to the curser as you move. The selected area fills in to
show you what is being measured. The completed area is recorded in the Dialog Box
when you return to the start point or when you select "Finish" in the
Dialog Box.
You may take-off curved areas by using the "Trace Curve" Button. |
| Rectangle | Measures a rectangular area. You start with one corner of the rectanglular area and drag the box to the opposite corner. A rubber band box is attached to the curser as you move. When you release the mouse button, the area is recorded in the Dialog Box. |
| Continuous Length | Measures a connected sequence of lengths. You start by selecting one
point, then work your way along the path, one point at a time. A rubber band line
is attached to the curser as you move. At the end of the sequence, you may double-click the
mouse button or select "Finish" in the Dialog Box to record the total length of the
line.
You may take-off a curved line by using the "Trace Curve" Button. |
| Interrupted Length | Measures a non-connected sequence of lengths. You must select the start and end point of each line. A rubber band line is attached to the curser as you move. The length of all lines and the number of segments (pieces) are totaled and recorded in the Dialog Box after each segment is completed. |
| Item Count | Counts items in the drawing. For each Left mouse click, an item is counted. A symbol is placed on the drawing for each count to show the items that have been selected. The count is totaled and recorded in the Dialog Box after each mouse click. |
Examples of the different types of measurement takeoffs:
Step 8: Copy Measurements to computer's clipboard (cache)
More information:
Copy Measurements to the Clipboard

Copy measurment values to your computer's clipboard (cache) by clicking the "Copy" button directly to the right of the measurement displayed in the Dialog Box.
Once copied, the measurement value can be pasted into a spreadsheet or your estimating software. Typically, you can paste the value by selecting the location where you want it (such as a cell in a spreadsheet), then using a "Ctrl-v" keyboard combination to paste it.
Copy ONE value at a time...your clipboard (cache) will only hold one value at a time. Each time you "Copy", it overwrites the previous value in the clipboard.
Step 9: Paste measurements into estimating software (use "Ctrl-v")
Step 10: Customize the "Measure Takeoff tool" settings
More information:
Customizing "Measure Takeoff Tool" Settings
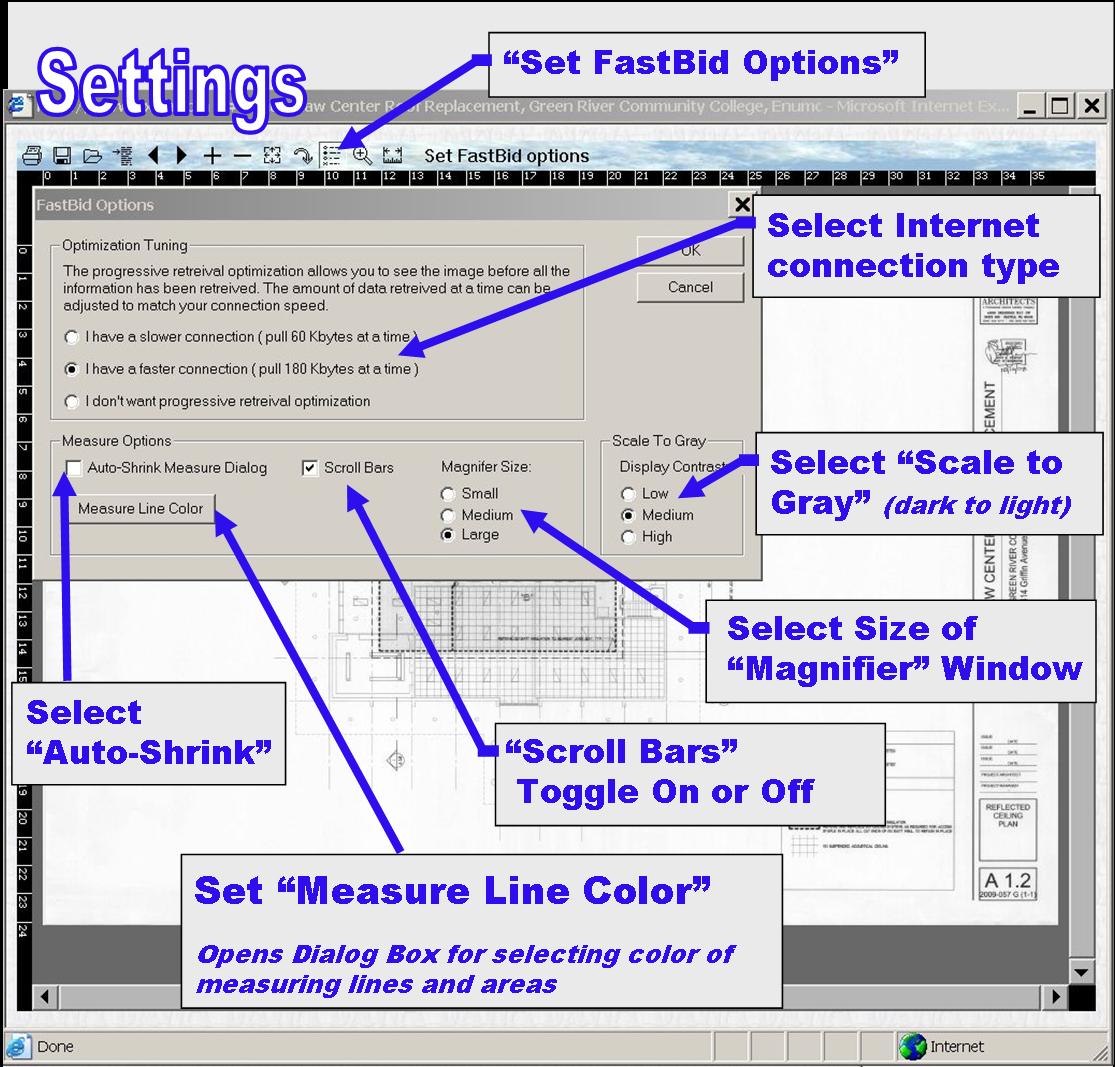
To change the optional settings for FastBid, select the "Set FastBid Options" button on the Toolbar.
Here are the options available in the "FastBid Options" Dialog Box:
|
Optimization Tuning (Internet Connection) |
FastBid uses "progressive retrieval" to speed-up your viewing of drawings
and specifications. FastBid first retrieves the part of the image you need to fit in
your current Zoom window...then, while you are viewing the Zoomed window,
the remainder of the document image is retrieved in the background.
Faster viewing occurs when FastBid is "tuned" to match the speed of your Internet connection: If you have a high speed connection, select "I have a faster connection"...otherwise, select "I have a slower connection". If you don't know what your connection speed is, then try both options to find which works best. Note: if you select "I don't want progressive retrieval", the entire image must be downloaded before it will display. This option is slower and is not recommended. |
| Auto-Shrink (Measure Dialog Box) |
When checked, the Measure Dialog Box will shrink to a smaller box and allow
more room in the drawing display. As soon as the mouse pointer "hovers" over
the Dialog Box, it returns to full size.
If left unchecked, the Measure Dialog Box remains full sized. Notice that the Measure Dialog Box can be dragged to any convenient location on your monitor screen (regardless if Auto-shrink is checked or left unchecked). |
| Measure Line Color | The color of a measuring line displayed during a take-off is a matter of personal preference. Click the "Measure Line Color" button to bring up the color selection Dialog Box and select an appropriate color. |
| Scroll Bars | This selection turns On or Off the Scroll Bars located at the side and bottom
of the drawing display. When On, they provide one method to "Pan" the display.
Turn the Scroll Bars Off if you need more space for the drawing display.
Note: the fastest method to "Pan" the display is to hold down the Right mouse button and drag the display. |
| Magnifier Size | Choice of "Magnifier Size" is a matter of personal preference. The "Magnifier" window automatically appears each time that a measuring point is selected (with a Left mouse click). Try each option to see what works best. |
| Scale to Gray | Scale to Gray sets the amount of contrast in the drawing display. The standard setting is Medium...this works for almost all images. If the image has a dark background, try High to see if this improves readability. For images that have light linework, gray tones or photos, try Low. |